A chapter from
Explorable Flexagons
Next chapter:
Flex Sequences
New Flexes
How to define flexes with pat notation
Why can you apply a flex in one place and not another? How does the flexagon simulator know where flexes can be performed? How does it know how the flexagon changes when you do a flex?
Have you looked at the funny notation along the edges of the flexagon in the simulator and wondered what it means?
Perhaps you noticed that - is next to a triangle containing only a single leaf
and [- -] is next to a pair of leaves folded on top of each other.
But then you saw [[[- [- -]] -] -] and figured it was too complex to worry about.
Well, that notation describes the internal structure of the flexagon, and it’s exactly that structure that determines where you can do a particular flex. Understanding that internal structure is key to understanding how a flex rearranges the leaves in a flexagon.
Pat notation
- Leaf: An individual polygon in a folded or unfolded flexagon
- Pat: A stack of leaves in a folded flexagon
For example, a hexaflexagon consists of 6 pats, where each pat contains 1 or more leaves. Every leaf is connected to exactly two other leaves in a folded flexagon, and every pat is connected to exactly two adjacent pats.
- Pat notation: Notation used to describe how leaves are folded in a triangle flexagon, consisting of pairs of leaves and/or subpats
The notation displayed by the flexagon simulator doesn’t differentiate between individual leaves.
It uses - to represent a generic leaf.
This is sufficient when you just need to understand how the folds in a pat are nested.
But if you want to understand how flexes work,
you use a more precise notation by uniquely labeling every leaf and using those labels instead of -.
Enough talk. Let’s see what this actually looks like. Below are templates for all the different ways to fold a pat with 2, 3, or 4 leaves (1 leaf is trivial).
Cut out each of the templates and assemble them by folding the highest pair of numbers together, then the next highest together and so on until you have a single pat.
Note that turning over 1, 2, and 4b gives you the exact same nesting structure,
but turning over 3, 4a, and 4c gives you a different nesting of leaves.
Thus there are actually 9 different leaf arrangements for pats with 1, 2, 3, or 4 leaves in them:1, 2, 3, -3, 4a, -4a, 4b, 4c, and -4c.
2: 3:
4a:
4b:
If you fold those sample pats and look at the results, you’ll note that the hinges between triangles can occur at any of the three edges. But, it turns out that we don’t have to model that detail in order to capture the important structure. The important part is how the hinges are nested. If you know the nesting and which leaves connect to adjacent pats, you can infer which of the three edges the hinge connects.
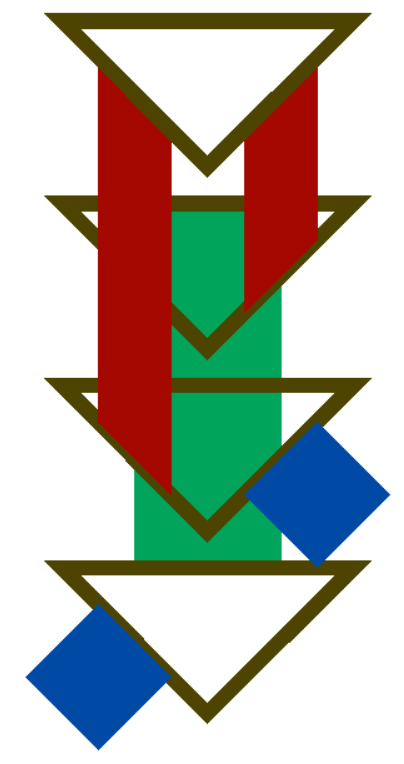
The adjacent picture of triangles and colored hinges gives you an exploded view of what the nesting looks like for 4a.
The 4 triangles represent the 4 leaves in the pat, and the colored pieces indicate where the hinges are.
The blue coming in from the bottom left connects to the pat to the left.
The green hinge connects the bottom leaf along the back to the leaf a couple levels up.
The red hinge on the right connects that leaf to the top leaf,
and the hinge on the left connects the top leaf to the leaf a couple levels below.
Finally, the blue on the right connects to the pat on the right.
Pat notation groups leaves and subpats together by how they’re nested.
A single leaf is -.
Two leaves folded together is [- -].
If you fold a leaf and a 2-pat together, you either get [- [- -]] or [[- -] -],
depending on the order of the two pieces.
When tracking how the internals of a flexagon change during a flex, we need to be able to track each leaf,
so we label every leaf with a unique id.
If our labels are numbers, one side can be positive and the flip side negative.
Thus we could describe 4a as [[[3, -2], -4], 1] or [[[1, 2], 3], 4], depending on our choice of labels.
Using this, we can describe the 9 different ways to assemble pats with 4 or fewer leaves. The following assumes the leaves are labeled in the order they occur in the unfolded template.
- 1:
1 - 3:
[[-2, 3], 1] - 4a:
[[[3, -2], -4], 1] - 4b:
[[3, -4], [1, -2]] - -4c:
[-4, [[-2, 1], 3]]
- 2:
[-2, 1] - -3:
[3, [1, -2]] - -4a:
[-4, [1, [3, -2]]] - 4c:
[[-2, [-4, 3]], 1]
To describe an entire flexagon, you simply string together the descriptions of each pat, going clockwise around the flexagon.
So a 3-faced hexaflexagon might look like [[1, 2], 3, [4, 5], 6, [7, 8], 9].
To describe the effect of a flex, you note the state before the flex and after the flex.
But how can you use this to predict what a flex will do rather than simply recording what it did after you do the flex?
Defining and applying a flex
Here’s the definition of the pinch flex on a hexaflexagon using pat notation:
- before:
[[-2, 1], -3, [5, -4], 6, [-8, 7], -9] - after:
[2, [-4, 3], -5, [7, -6], 8, [1, 9]]
A flex definition in pat notation lists its before and after state.
It can be used to figure out if a flex can be performed and how the flexagon changes if the flex is applied.
This tells us both if we can do the pinch flex in a particular location and how it would change the flexagon if we did.
Each pat in the flexagon must have at least the structure described by the before state in order to support the pinch flex.
The first pat must have at least 2 leaves ([-2, 1]),
the second pat (-3) can be anything (since pats always have at least 1 leaf),
the third pat must have at least 2 leaves ([5, -4]), etc.
So, for example, we can do a pinch flex if our current flexagon looks like [[1, 2], [3, 4], [5, 6], [7, 8], [9, 10], [11, 12],
but not if it’s [1, 2, [3, 4], 5, [6, 7], 8].
Let’s look at how that flex definition tells us how a given flexagon will change. We’ll start with a flexagon that has the following structure:
- flexagon:
[[1,2], 3, [4,[5,6]], [7,8], [9,10], [[11,12],[13,14]]]
To avoid confusing the flex’s before/after patterns with the structure of the flexagon we’re transforming, we’ll use numbers for the flexagon structure and letters for the pinch flex definition:
- before:
[[-b, a], -c, [e, -d], f, [-h, g], -i] - after:
[b, [-d, c], -e, [g, -f], h, [a, i]]
Next, let’s look at how each of the pats in the flexagon lines up with pats in the before portion of the flex definition.
- before pattern:
[[-b, a], -c, [e, -d], f, [-h, g], -i] - flexagon state:
[[1,2], 3, [4,[5,6]], [7,8], [9,10], [[11,12],[13,14]]]
-[a, b] = [-b, -a]We’ll also use a simple identity for how the structure changes when we turn over a pat:-[a, b] = [-b, -a], in other words, turning over [a, b] results in [-b, -a].
[-b, a] = [1, 2], thereforea = 2andb = -1-c = 3, thereforec = -3[e, -d] = [4, [5, 6]], thereforee = 4andd = [-6, -5]f = [7, 8][-h, g] = [9, 10], thereforeg = 10andh = -9-i = [[11, 12], [13, 14]], thereforei = [[-14, -13], [-12, -11]]
Now we substitute those values into the after state of the flex.
- after pattern:
[b, [-d, c], -e, [g, -f], h, [a, i]] - result:
[-1, [[5,6],-3], -4, [10,[-8,-7]], -9, [2,[[-14,-13],[-12,-11]]]]
Thus, we can predict exactly how a flexagon will be modified when we apply the pinch flex.
Flex definitions
Here are definitions of flexes we’ve discussed so far for the hexaflexagon:
>:[1, 2, 3, 4, 5, 6]->[2, 3, 4, 5, 6, 1]- <:
[1, 2, 3, 4, 5, 6]->[6, 1, 2, 3, 4, 5] - ^:
[1, 2, 3, 4, 5, 6]->[-6, -5, -4, -3, -2, -1] - F:
[[1, 2], 3, 4, 5, [[6, 7], [8, 9]], 10]->[7, [[-1, 3], [10, -2]], 4, 5, 8, [-6, -9]] - P:
[[1, 2], 3, [4, 5], 6, [7, 8], 9]->[-1, [5, -3], -4, [8, -6], -7, [2, -9]] - S:
[[1, 2], 3, 4, 5, [[[6, 7], 8], 9], 10]->[[1, [8, [2, -10]]], 3, 4, 5, [7, 9], -6] - St:
[[1, [2, 3]], 4, 5, 6, [7, [8, 9]], 10]->[2, [[-1, 4], -3], 5, 6, 8, [[-7, 10], -9]] - T:
[[[1, 2], 3], 4, 5, [6, 7], 8, 9]->[2, 4, 5, [6, 7], 8, [-1, [9, -3]]] - Tf:
[[[1, 2], 3], 4, 5, 6, 7, 8]->[2, 4, 5, 6, 7, [-1, [8, -3]]] - V:
[1, [2, 3], [4, 5], 6, 7, [8, 9]]->[[3, -1], -2, -5, [-6, 4], [9, -7], -8] - Ltf:
[[[[1, 2], 3], 4], 5, 6, 7, [8, 9], 10]->[10, [2, 4], -1, 3, 5, [8, [6, [9, -7]]]] - Ltb:
[[[1, [2, 3]], 4], 5, 6, 7, [8, 9], 10]->[-4, 1, -3, [-5, 2], [[7, -9], -6], [-10, 8]] - Lbf:
[[[1, 2], 10], [4, 3], 5, 6, [8, 7], 9]->[[-2, -1], -3, [-5, 4], [7, -6], -8, [10, -9]] - Lbb:
[[[2, -3], -1], [5, -4], 6, 7, [[-9, 10], 8], 11]->[2, [-4, 3], -5, [[7, -8], -6], -9, [[11, 1], -10]] - Lh:
[[[1, [2, 3]], 4], 5, 6, 7, [[8, 9], 10], 11]->[[[11, -4], -9], 1, -3, [-5, 2], [[7, -10], -6], 8] - Lk:
[[[[1, 2], 3], 4], 5, 6, 7, [[[8, 9], 10], 11], 12]->[-8, [2, [10, [4, -12]]], -1, 3, 5, [9, [6, [11, -7]]]]
Many of these can be generalized to flexagons beyond just the triangle hexaflexagon.
More details
The notation we’ve been using to describe the nesting structure captures almost everything needed to understand where you can perform a flex. But there are a few missing details.
- Where a pat connects to adjacent pats
- If any additional structural freedom is needed in order to perform the flex
- Whether the angles along the edges of the flexagon allow the flex
1. How pats are connected and rotated
When a flexagon is made up of triangles with 2 or 3 different angles, you may have noticed that some flexes rotate the pats so that a different angle is in the center of the flexagon. To fully capture the behavior of flexing, you need to know how the pats are rotated or flipped.
- Some flexes that don’t affect pat rotation:
^,T,S,F,St,Lk,Ltf,L3,P333,P334 - Some flexes that mirror the pats:
>,< - Some flexes that mirror and rotate pats:
P,V,Lh,Ltb,Lbf,Lbb
This effect is most noticeable when the angles of the triangles are unequal or if you decorate the leaves assymetrically. In the following flexagon, you’ll notice that it no longer lies flat after doing a pinch flex, but the tuck and pyramid shuffle don’t affect how the triangles are rotated.
2. Additional needed structure
Some flexes need additional structure in order to provide enough freedom to perform a flex, even if that additional structure isn’t otherwise affected by the flex.
The tuck flex provides a good example of this. If you only write out pat notation for the part of the flexagon that changes, you get the following:
- before:
[[[-2, 3], 1], 4, 5, 6, 7, 8] - after:
[3, 4, 5, 6, 7, [2, [8, -1]]]
If you make that flexagon, you’ll find that you can’t actually flex it, unless you’re willing to really force it and do some damage to the flexagon, or perhaps trim the leaves. This is because when you’re doing the flex, you need to open it somewhere across from where you’re doing the tuck in order to have enough freedom of movement.
Here’s what the pats look like when you add in the extra flap ([-7, 6]) you need in order to open up the flexagon during flexing:
- before:
[[[-2, 3], 1], 4, 5, [-7, 6], -8, -9] - after:
[3, 4, 5, [-7, 6], -8, [2, [-9, -1]]]
On flexagons with more than 6 pats, there may be multiple places you could add an extra flap to support the tuck flex.
In flexagonator, the flexagon simulator used for these interactive simulations,
this is captured by specifying multiple tuck variants:T1 if the flap is in one place, T2 if it’s in another, etc.
This isn’t ideal for general flexing, since they’re actually all the same flex.
But it’s good when specifying a generating sequence because you have to be explicit about where new leaves were added.
That first flex is called the forced tuck, or Tf.
It can be useful when trying to explore every possible state for a given flexagon,
but otherwise it isn’t a practical flex.
3. Angles along the edges
Some flexes only work if the angles of the triangles are within a certain fuzzy range. Once you start going beyond that range, it gets harder to do the flex without damaging the flexagon.
A good example of this is the flip flex. On some flexagons, like a hexaflexagon made of 30-60-90 triangles, it’s an elegant flex at one vertex but practically impossible at the vertex right next to it. If you create the following flexagon, you’ll find that you can only do one of the two flip flexes that are theoretically possible.
Note that flexagonator doesn’t know when the angles have gone beyond the acceptable range, so it will allow you to perform flexes in places where a physical model may not.
Creating a new flex
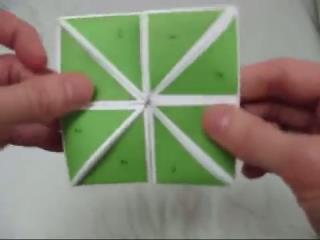
Let’s say you were playing around with a silver octaflexagon where all the pats had two leaves...
...and you found a new flex that looked like this...
...and you wanted to add that flex to flexagonator so you could experiment with it further. How would you go about creating a flex definition using pat notation to enable that?
Well, the basic idea behind providing a flex definition is that you describe the state of the flexagon before the flex and the state after the flex. You could do that for this flexagon, but is it really the case that every pat has to have 2 leaves in order to perform this flex just because the flexagon you tried it on does? If not, your definition wouldn’t be general enough, ruling out cases where you could actually do the flex. How do you address this issue?
One technique is to mark every face of every leaf that you expose during the flex so you know which ones are required. Start by marking every leaf on both of the visible faces. Then slowly go through the motions of doing the flex, marking each leaf as it first becomes visible. When you’re done, paste together all the faces you didn’t need and look at the results.
For this particular flex, you’ll find that the starting pat structure you need is[[-, -], [-, -], -, -, [-, -], [-, -], -, -].
You only need 12 leaves, not the full 16 leaves that the original flexagon had.
Now number one face of every remaining leaf, labeling the backsides with the negative version of the front side.
Write down the starting state, do the flex, then write down the ending state.
You should end up with something that looks like this (though you might have chosen different labels):
- before:
[[2, -1], [-4, 3], -5, -6, [8, -7], [-10, 9], -11, -12] - after:
[-2, -3, [5, -4], [-7, 6], -8, -9, [11, -10], [-1, 12]]
You can add this flex definition in the Flexagon Playground by pasting the following script into the “Flexagon from Script” section:
[
  {"pats": [[0,0],[0,0],[0,0],[0,0],[0,0],[0,0],[0,0],[0,0]]},
  {"angles": [45,45]},
  {"addFlex": {
    "name": "my new flex",
    "shorthand": "Mnf",
    "input": [[2, -1], [-4, 3], -5, -6, [8, -7], [-10, 9], -11, -12],
    "output": [-2, -3, [5, -4], [-7, 6], -8, -9, [11, -10], [-1, 12]]
  }},
  {"searchFlexes": "P S St F T1 T1' T2 T2' Mnf"}
]
See flexagonator’s script API for more information on what can go into a script.
This flex actually has a name: the twist flex, with shorthand of Tw.
It also works on other right triangle flexagons such as the decaflexagon and dodecaflexagon.
What next?
There are lots of other flexes out there to find. Pat notation gives you a way to explicitly describe what the flex does, and the playground gives you the ability to explore using any flex you define.
Pat notation gives you a way to figure out what effects flexes will have. This gives you the ability to figure out when two flex sequences are equivalent. What else could you do with this notation?
This page only describes the pats in a triangle flexagon. What about flexagons made from squares or other quadrilaterals? What about pentagons, hexagons, etc.?
Return to the Table of Contents.
